
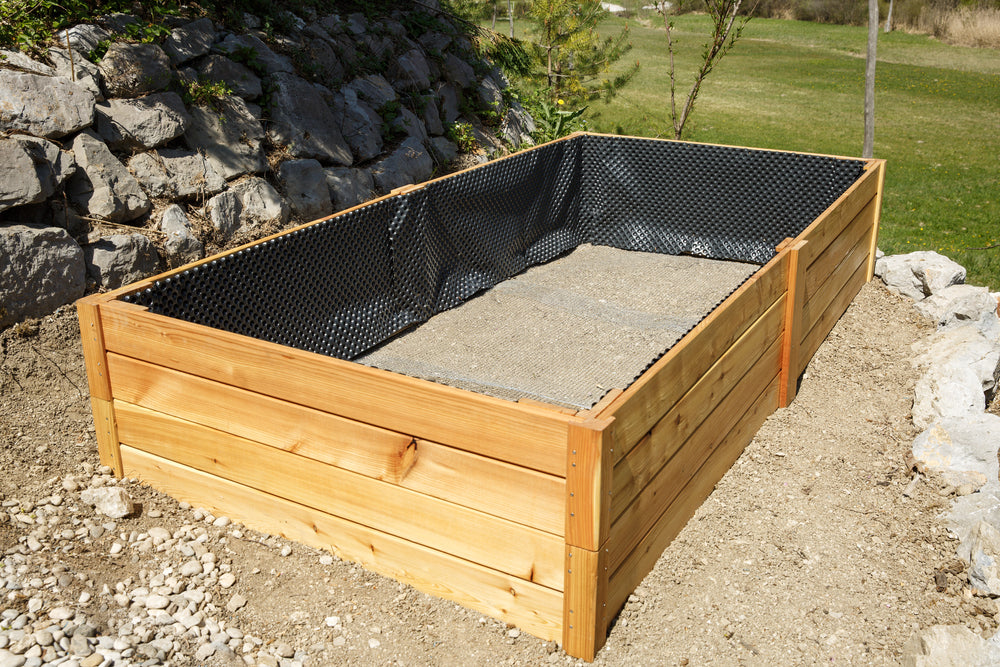
Build a Raised Bed Yourself: Step-by-Step Guide
- Why build a raised garden bed?
- How to choose the right location for your raised garden bed
- Materials and tools list – everything you need
- How to build a wooden raised garden bed – step-by-step guide
- How to build a raised garden bed from pallets – an easy DIY project
- How to build a stone raised garden bed – sturdy and durable
- How to fill and plant a raised garden bed correctly
- How to grow and care for your raised garden bed all year round
- Protection against voles and other pests
- Your quick-reference guide: everything important at a glance
Do you want to build your own raised garden bed and use it to grow vegetables, herbs and flowers sustainably? In this detailed step-by-step guide, you'll learn everything you need to know: from choosing the ideal location, through the detailed materials list, to filling and later planting it up correctly. You'll learn how to build raised beds from wood, pallets or stone step by step, and we'll explain how to use FUXTEC tools to make your raised bed not only sturdy and weatherproof, but also ergonomic and easy to maintain. This way, you'll create a robust raised bed that brings you years of enjoyment and a bountiful harvest.
Why build a raised bed?
Building a raised bed is worthwhile for many reasons. You'll enjoy back-friendly gardening and can harvest early-ripening vegetables and herbs as early as spring. Anyone who builds their own raised bed benefits from faster soil warming, better drainage and less weeding. Thanks to the height of your beds, you can tailor the soil perfectly — ideal for heavy feeders like courgettes, as well as other vegetables and herbs, but also for lettuce, radishes and spinach, which can be sown directly into the bed.
Raised beds made from wood are especially popular because they're relatively easy to build yourself. With our step-by-step guide, you'll see exactly how to set boards and beams at the right angle to create a sturdy, self-built raised bed. Whether you prefer a raised bed made of stone or a model made from pallets, you'll find the right instructions here too. A robust raised bed offers not only the length and width you want, but can also be lined with pond liner to protect the wood from moisture.
Finding the right location for your raised bed
The right location is the foundation for any raised bed. Look for a spot in your own garden that gets at least six hours of sunshine a day. Ideally, your raised bed should stand on level ground so the fill stays even and doesn't slope. A spirit level helps you get the bed perfectly aligned.
Make sure the location for your raised bed offers enough space for maintenance and watering. From our range, the FUXTEC garden watering system is particularly well suited to ensure your plants never dry out. Also think about tool access: a FX-E1IS20 cordless combi drill will later help you screw the timber boards together and fit the pond liner or bubble wrap.
Materials list and tools – everything you need
So you can get started right away, here's a clear list of materials and tools for your self-built raised bed:
Materials
- Timber boards (e.g. larch or Douglas fir) for the side walls
- Beams for corners and bracing
- Pond liner or bubble wrap as moisture protection
- Screws and angle brackets
- Pallets (optional, for a raised bed made from pallets)
- Planting soil and compost for filling
- Gravel and twigs for the drainage layer
Tools
- Cordless combi drill
- Cordless circular saw (or similar)
- FUXTEC axes for detail work
- Spirit level
- Tape measure and pencil
Material requirements for a raised bed (120 × 80 × 40 cm)
| Component | Quantity | Notes |
|---|---|---|
| Timber boards 2 × 20 cm | 10 pieces | Larch or Douglas fir, weatherproof |
| Beams 6 × 6 cm | 4 pieces | For sturdy corners |
| Screws 6 × 60 mm | 50 pieces | Galvanised, suitable for cordless drill |
| Angle brackets | 8 pieces | For added stability |
| Pond liner | 1 × 2 m | Protects wood from moisture |
| Gravel | 100 l | Drainage layer |
| Compost | 100 l | Base for nutrient supply |
| Planting soil | 100 l | Top layer for planting |
Building a raised bed from wood yourself – step-by-step guide
If you want to build your wooden raised bed yourself, grab our step-by-step guide. Cut the boards carefully and screw them together at right angles. This makes it easy to create a sturdy raised bed for your garden.
First, prepare the timber boards and beams. Cut them precisely using the FUXTEC circular saw or a jigsaw. Remember to treat the surfaces and cut edges with wood preservative so your new wooden raised bed lasts a long time.
Next, set up the corner posts and screw on the side boards:
- Align the posts on the ground and secure them with angle brackets
- Fit the timber boards step by step from bottom to top
- Check the heights constantly with a spirit level
Building a raised bed from pallets – simple to build yourself
Building a raised bed from pallets offers you a quick and cost-effective way to build your raised bed without buying new timber boards. With used pallets, you can put together an individual raised bed DIY-style. Make sure the pallets are untreated and free from harmful substances. Before you start assembling, thoroughly clean the pallet and remove any protruding nails or splinters. This ensures your pallet raised bed stands sturdily and poses no risk of injury.
Next, stand two pallets upright on the longer sides and connect them with crossbeams or old planks. Using the FX-E1IW20 cordless combi drill, you screw the elements securely together. Two pallets are enough for a standard-size raised bed. Of course, you can build it to whatever size suits your garden. Once the basic frame is in place, use pond liner as a moisture barrier, fixing it along the inner surfaces with the cordless drill. This protects the wood from damp and keeps your bed system durable for longer.
| Benefit | Pallet raised bed | Timber raised bed |
|---|---|---|
| Cost | very low | medium to high |
| Build time | 1–2 hours | 3–4 hours |
| Customisation | rustic look | flexible design |
| Moisture protection | can be added with pond liner | built-in treatment |
Building a raised bed from stone yourself
If you want to build a raised bed from stone yourself, you'll create an extremely robust and weatherproof structure. A bricked raised bed made of clinker brick, natural stone or concrete blocks offers you exceptional durability and an elegant look in the garden. It's important to lay solid groundwork: a well-compacted layer of gravel or grit as drainage prevents waterlogging in the bed. Then, use a spirit level to align the first row of stones precisely.
When building a raised bed from stone, mix the mortar according to the manufacturer's instructions and lay the stones row by row. Make sure to fill the joints evenly and neatly — a pond liner protective layer on the inside also ensures that no moisture penetrates the brickwork. Once the brickwork has reached the desired height, fit a sturdy cap made of wood or aluminium profiles to protect the top layer of stone from wear. This way, your new stone raised bed is perfectly equipped to withstand wind and weather.
Filling and planting your raised bed: how to do it right
Filling your raised bed correctly is essential — if you get this badly wrong, you won't get a good harvest.

First, lay a drainage layer of gravel or coarse branch cuttings to prevent waterlogging and to give voles hardly any breeding ground. This is followed by organic materials such as leaves and grass clippings. In the middle layer, spread well-rotted compost, which provides plenty of nutrients. The top layer consists of high-quality garden soil or planting soil, perfect for your vegetables and herbs.
For a clear overview, here are the layers in the raised bed:
- Bottom layer: 10–15 cm gravel or coarse branches
- Middle layer: 10–15 cm leaves, grass clippings, twigs
- Compost layer: 15–20 cm mature compost
- Planting layer: 20–30 cm garden soil or planting soil
After filling, it's time to plant. You can plant directly into the raised bed or set in young plants beforehand. For a mixed cultivation approach, combine light feeders, medium feeders and heavy feeders so each plant gets enough space and nutrients. Lettuce and radishes can be sown directly into the bed as early as the cold frame period, while courgettes, peppers and chard are best planted as young plants.
Thanks to the raised height and good heat retention, your raised bed can impress you early in the year. From March onwards, plant robust varieties such as lamb's lettuce, spinach or radishes directly into the bed, securing your first harvest as early as spring. With a simple cold frame topper or a light fleece cover, you protect your young plants from late frosts and extend the growing season. Be sure to cover the bed at night and ventilate it during the day so heat doesn't build up and the temperature in the raised bed stays pleasant.

In summer, look after your raised bed by watering regularly and providing shade during strong sunshine. A mulch of straw or wood chips retains moisture in the soil and prevents the bed from drying out. Once autumn arrives, plant kale, winter spinach and lamb's lettuce. With garden fleece or a light polytunnel, you protect the plants from cold snaps and can keep your raised bed planted all year round. Regularly removing old plant remains and topping up with compost keeps the nutrient balance in check.
Making your raised bed pest-proof
Voles can quickly cause serious damage in a raised bed by digging tunnels beneath the roots and attacking your plants. A tried-and-tested method is to lay a fine vole mesh made of plastic or wire beneath the bottom drainage layer. This ensures unwanted rodents can't get into the bed. When filling the bed, make sure to overlap the mesh so no gaps are left.
"If the slug can't get into the bed in the first place, there's no need to drive it out." – Judith Rakers
Aphids, slugs and fungus gnats are also frequent visitors to raised beds. With well-planned mixed cultivation and the use of beneficial insects such as ladybirds and lacewings, you can create a natural balance that keeps pests in check. Remove affected leaves immediately and, if needed, use a mild soap solution or neem oil. Regularly ventilating the cover also prevents trapped moisture, which encourages fungal infections.
Building a raised bed yourself: everything important at a glance
- Choosing a location: at least six hours of sunshine a day, level ground
- Construction: screw timber posts together at right angles, line with pond liner or bubble wrap
- Filling: gravel or branch layer → leaves/grass clippings → compost → garden soil
- Planting: alternate light, medium and heavy feeders, plant young plants from April
- Year-round gardening: use a cold frame topper, polytunnel or garden fleece
Care: mulching, regular watering, removing dead plant matter - Pest protection: lay vole mesh, encourage mixed cultivation, introduce beneficial insects
- Tools & accessories: FUXTEC FX-E1IS20 cordless combi drill, FUXTEC circular saw
Discover our range of garden tools
How much sunlight does a raised bed need?
Your raised bed should receive at least six hours of direct sunlight per day to ensure healthy plant growth and a good harvest. Choose a location with level ground so the soil settles evenly and the bed remains stable.
What wood is best for building a raised bed?
Larch and Douglas fir are excellent choices because they're naturally weatherproof and resistant to decay. Make sure to treat all surfaces and cut edges with wood preservative to extend the lifespan of your wooden raised bed.
Can I build a raised bed from pallets?
Yes, building from untreated pallets is a quick and cost-effective option that takes only 1–2 hours. Clean the pallets thoroughly, remove any nails or splinters, then screw them together with a cordless drill and line the interior with pond liner for moisture protection.
How should I fill my raised bed with soil?
Layer your raised bed from bottom to top with gravel or coarse branches (10–15 cm), leaves and grass clippings (10–15 cm), mature compost (15–20 cm), and finally garden or planting soil (20–30 cm). This layering improves drainage and provides excellent nutrients for your plants.
How do I protect my raised bed from voles and slugs?
Lay a fine vole mesh beneath the drainage layer to prevent rodents from tunnelling into your bed. Encourage mixed cultivation and beneficial insects like ladybirds, and remove affected leaves promptly to manage slugs and other pests naturally.
What's the difference between a pallet and timber raised bed?
Pallet beds are faster to build (1–2 hours) and very affordable, whilst timber beds take 3–4 hours but offer more flexible design options and built-in durability. Both work well when lined with pond liner for moisture protection.
More articles about garden care
Trockenheit im Garten: Boden lockern, richtig gießen und mit Mulch Wasser sparen
Du gießt das Beet, doch das Wasser bleibt auf der harten Erdoberfläche stehen oder läuft zur Seite ab. Schon nach kurzer Zeit wirkt der Boden wieder trocken, obwohl Du gerade erst zur Gießkanne g...
Pine Bark Mulch: The Complete Gardening Guide
Mulching with pine bark is one of the most effective methods in modern gardening and sustainable horticulture. A layer of mulch material is applied to the soil surface to protect and improve the so...
Spring Soil Improvement: Prepare Your Garden Soil
Inhaltsverzeichnis Warum Bodenverbesserung im Garten im Frühjahr so wichtig für einen gesunden Gartenboden ist Gartenboden nach dem Winter prüfen: Bodenstruktur, Verdichtung und Bodenart erke...


