


Build a Garden Lounge Yourself: DIY Step-by-Step Guide
A garden lounge of your own turns a spare corner of the garden into a real favourite spot. It's not just any seat, not just a single piece of furniture — with this final piece your garden oasis comes together: fire pit, outdoor bar, privacy screen, garden bench and now your new lounge. That's exactly why this guide is the finale of our DIY series on summer garden projects. Having already learnt individual build guides for a fire pit, outdoor bar, garden bench and privacy screen, it's now time to think of the outdoor area as a whole.
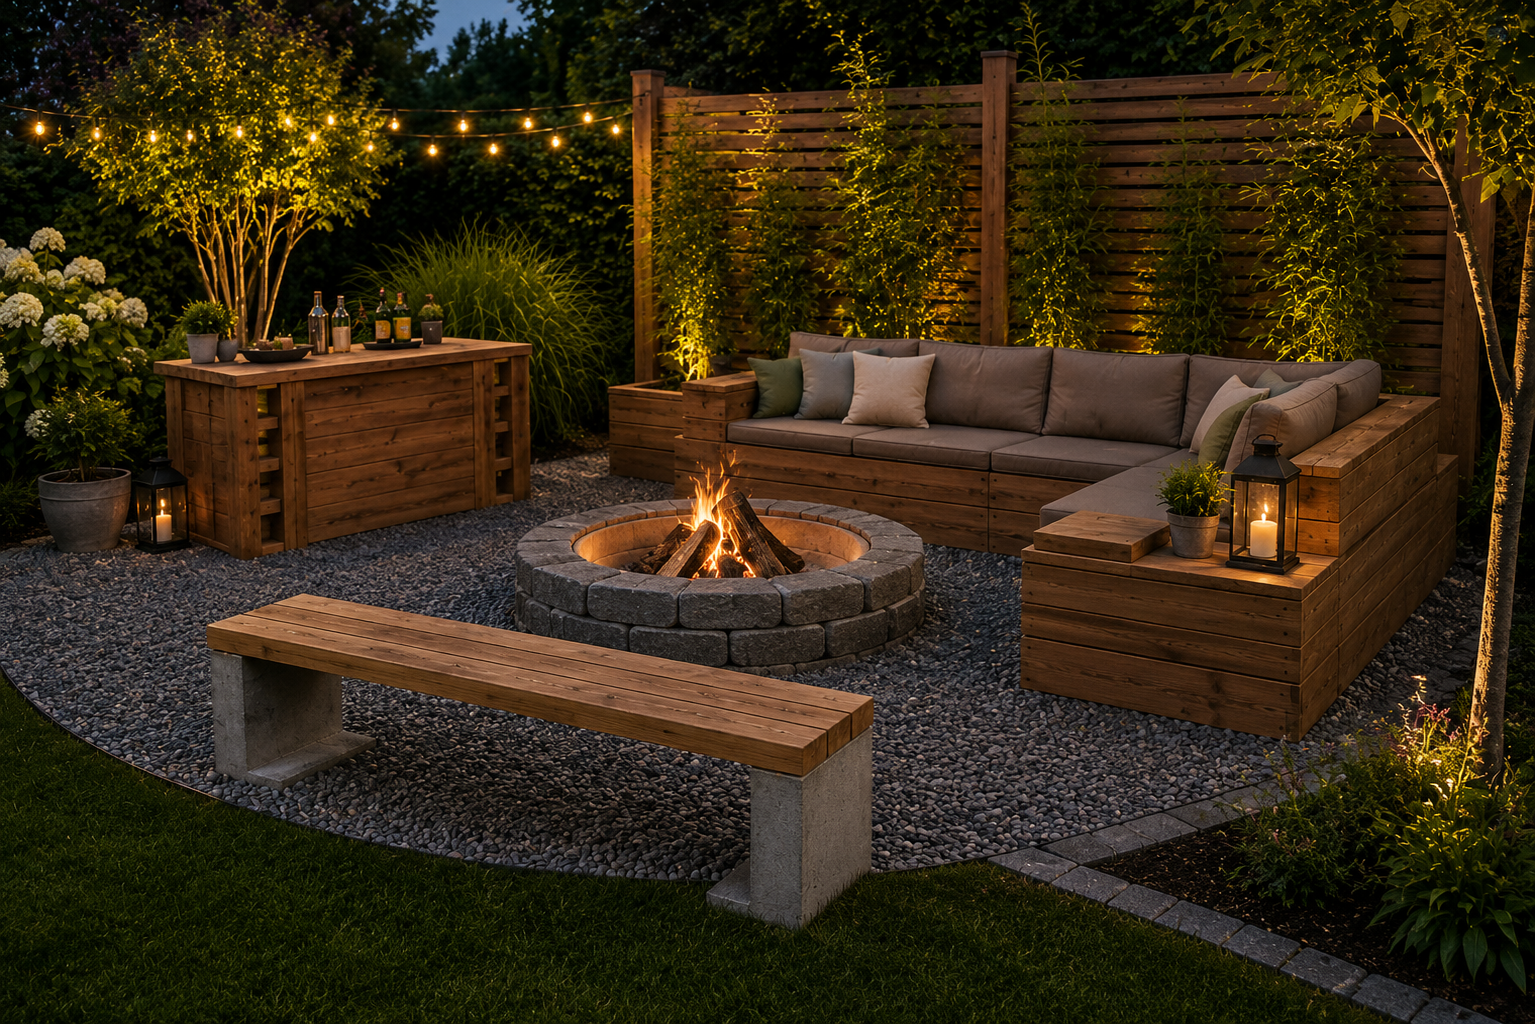
Our idea: build an L-shaped garden lounge from sturdy pallets and timber cladding. It works best positioned right in front of the privacy screen, opening up towards the fire pit and leaving space to the side for the bar. This creates a cohesive seating area that doesn't look thrown together, but like a lovely outdoor living room. The build stays simple enough for a weekend project, yet clean fronts, a gently angled backrest and matching cushions make it look far more polished than a classic pallet sofa.
The great thing about this project: you can plan the garden lounge modularly, adapt it to your space and extend it later. For a large patio, build the long L-shape. For a small patio or a balcony, scale the concept down to a single straight module. And if you need more space later, you can simply add further modules or combine it with a side table.
Planning your garden lounge: lounge, garden furniture and garden as one overall picture
Before you pick up the saw, it's worth taking a moment to look at the bigger picture. A garden lounge works best when it doesn't stand isolated in the garden. It should relate to a clear zone: the privacy screen, a patio edge, under a tree, next to the outdoor bar, or facing the fire pit. That's how you create a relaxing spot that fits naturally into the garden.
For our FUXTEC concept, the garden lounge is planned as an L-shape. The long side is about 240 cm wide, the short side about 160 cm deep. With cushions, the seat height comes in at around 40 to 45 cm. The seat depth is based on a Euro pallet and offers enough comfort not just to sit upright, but to properly relax.
It's important to place the lounge on a firm, level surface. On a patio this is usually straightforward. On lawn or bare earth, use paving slabs, path slabs or a compacted gravel bed. This keeps the pallets sitting level, helps the wood stay drier for longer, and prepares the construction to withstand the weather. Especially with DIY garden furniture made from wood, the base often determines whether it still looks good after one season or has already started soaking up moisture.
When designing your garden lounge, also think about sightlines. Ideally, you'll be looking from the lounge towards the fire pit. The garden bench sits opposite, adding extra seating. The outdoor bar sits to the side, so drinks, glasses and snacks are within easy reach. That's how you get an outdoor oasis that not only looks good but genuinely works day to day.
Materials and tools: building your own outdoor lounge with FUXTEC
You won't need any complicated specialist parts for this outdoor lounge. The base is made from new Euro pallets or sturdy solid-wood pallets. Used pallets can look charming, but aren't always recommended, since you never quite know what they were used to transport. For a seating surface you'll later dress with cushions, throws and pillows, clean new pallets are the better choice.
For the visible fronts, use planed timber boards or wooden planks. This step is exactly what turns a simple pallet build into a more stylish garden sofa. The pallets recede visually into the background, the surface looks calmer, and it works better alongside a garden bench with a timber seat, a wooden privacy screen and a rustic outdoor bar.
For the version shown here, you'll need around six to eight Euro pallets, depending on whether you build the backrest from pallet pieces or from boards. Add planed timber boards for the front cladding and armrests, sturdy wood screws, angle brackets, sandpaper, wood stain/preserver or outdoor oil, and suitable cushions.
When it comes to tools, a cordless set-up is especially handy, since you're usually not working right next to a plug socket outdoors. A FUXTEC cordless jigsaw is ideal for the cuts. Use a FUXTEC cordless drill driver or combi drill for screwing everything together. For edges, corners and visible surfaces, a FUXTEC cordless multi-sander is a great help. That way you can carry out each step right where you're building, without trailing cables across the garden.
Alongside wood and tools, think about the finishing touches too. Large outdoor cushions provide seating comfort, while individual scatter cushions add your personal touch. A low side table, a couple of smaller side tables, or a tray on the armrest make the lounge more practical day to day. Materials like aluminium, poly rattan or rattan can work well as an addition if you want to incorporate furniture you already own. In this guide, though, the main material stays wood, so the lounge fits in with the rest of the DIY series.
The right tools for your garden lounge
For a sturdy garden lounge you need clean cuts, secure fixings, smooth edges and an even wood finish. These FUXTEC tools make building the seating modules, backrest, armrests and front cladding much easier.

Cordless drill driver
Ideal for screwing together pallets, seating modules, backrest, armrests and cladding boards for your self-built garden lounge.

Rotary hammer drill
Handy if you want to secure the garden lounge at specific points on a solid patio, against a wall, or into masonry.

Cordless jigsaw
Perfect for cutting armrests, front cladding, backrests and making smaller adjustments to the individual lounge modules.

Cordless circular saw
For straight cuts to boards, planks and battens, when you want to clad your garden lounge cleanly and give it a calmer look.

Cordless multi-sander
For smoothing cut edges, rounding off the armrests and preparing the wood surface before applying stain, oil or paint.

Cordless sprayer
Ideal for applying wood protection evenly across pallets, backrest, front cladding and hard-to-reach gaps.
Building the garden lounge: preparing the base and assembling the modules
The first step is choosing the spot. Lay the pallets out as a trial to see how the future L-shape will look. Leave enough distance between the fire pit and the lounge so the heat doesn't hit the cushions directly and no one has to walk too close to the fire when standing up. At the same time, the seating area should be close enough that the fire pit still feels part of the scene, rather than a separate feature dotted somewhere else in the garden.
If you're laying the area from scratch, a gravel bed with edging is a good solution. It suits the fire pit visually, lets water drain away and keeps the area low-maintenance. On an existing patio, it's usually enough to clean the surface and level out small unevenness. Use a spirit level to check the pallets sit flat. You can even out small differences with thin packing shims.
Now assemble the base modules. For one seating module, stack two pallets exactly on top of each other. Screw them together at several points through the pallet blocks. For the long side, you'll need two such double-stacked modules side by side. For the short side, build another module set at a right angle. That's how the L-shape takes form.
Make sure the modules line up cleanly. If the front edge of the long side and the front edge of the short side don't match up, the lounge will end up looking crooked. Take a few minutes here before screwing everything together permanently. Alignment is especially important with modular garden furniture, as the individual pieces will otherwise visually fight against each other.
Once the modules are sitting correctly, join them together with angle brackets or long screws. The construction doesn't need to feel like a fitted, permanent piece of furniture, but it shouldn't shift when you sit down. If you'd like to rearrange the lounge later, you can also connect the elements only loosely and keep the modules individually movable.
Backrest for the garden lounge: comfortable, sturdy and cosy
The backrest decides whether your garden lounge simply looks good or is actually comfortable. An upright backrest is quick to build but uncomfortable over time. A gently angled backrest is a better choice, supporting your back and making the seating area feel more homely.
You can build the backrest from another pallet or from cut timber boards. For our concept we recommend the calmer option using boards, since it works better alongside the front cladding. Cut several boards to the length of each seating side. Behind the seat, mount upright or slightly angled supports. Attach the backrest boards to these supports.
You don't need to calculate the angle in a complicated way. What matters is that the backrest leans back slightly and stays consistent across all modules. A narrow batten fixed at the lower section can help keep the angle steady throughout. Test the seating position now and then with a cushion in place. It's better to adjust now than to have to remove the whole backrest later.
For extra comfort, sand the top edge of the backrest carefully. The transitions between seat, backrest and armrest shouldn't have any rough spots either. Outdoor furniture often gets used barefoot, in shorts, or with thin clothing, which is exactly why careful detail work pays off here.
If you'd like to incorporate existing armchairs or a small lounge set as well, try to match the heights roughly. Mismatched seat heights quickly look messy. A single armchair next to the bar can work well if it complements the lounge rather than looking out of place.
Configuring the armrest, side surface and lounge furniture with style
A wide armrest turns the pallet construction into a proper piece of lounge furniture. It offers support, visually frames the seating area, and on some evenings even doubles as a side table. You can rest a drink on it, place a lantern, or set down a tray of snacks.
Build the armrest on the outer side of the short module, or at both ends of the L-shape. Use shortened pallet pieces for this, or build a simple frame from timber battens and boards. The calmest look comes from a closed-in armrest clad with the same boards as the front.
The top surface should be wide enough for a glass to sit securely. Allow for roughly 18 to 25 cm of width. Screw the top boards down from above or below, depending on how clean you want the surface to look. If screw heads remain visible, countersink them slightly and sand the surface smooth afterwards.
This is also where you can configure the lounge to suit your personal style. If you prefer a clean, modern look, go with straight lines, light-coloured cushions and minimal decoration. If you prefer cosy and natural, add cushions, lanterns, planters and warm lighting. The only thing that matters is that the lounge fits the overall picture alongside the fire pit, the garden bench and the outdoor bar.
If you'd like to extend the garden lounge later, the armrest also makes a good connection point for additional modules. You could, for example, build in a small storage box underneath, or add a separate corner element. That way the construction stays flexible without you having to start from scratch.
Cladding the fronts: making modular garden furniture look more refined
The most important step for the look is the front cladding. Without it, the pallet structure is instantly recognisable. That's not necessarily a bad thing, but it can look a bit improvised. With planed timber boards or planks, the pallets become a fully enclosed piece of furniture that looks far more refined.
Start by measuring the visible fronts of the modules. Cut the boards to length with the FUXTEC cordless jigsaw and dry-fit them against the front before fixing anything. Leave small gaps between the boards so moisture can drain away and dry out. Keep the gaps even, otherwise the surface will look uneven.
Then screw the boards to the pallet blocks or to additional cross battens. If you can't find good fixing points, mount a simple sub-frame of narrow battens first. That way you can align the front boards neatly and avoid screwing into awkward spots on the pallet.
The cladding should also cover the short side of the L-module and the outer armrest. This gives the garden lounge a cohesive, all-of-a-piece look. This matters especially alongside the fire pit and the garden bench: all the elements should speak the same visual language without being identical.
For an especially neat finish, you can mitre-cut the front boards at the corners. It's not essential, but it does look more professional. It's simpler to let the boards butt flush against each other and then sand the edges thoroughly.
Sanding, protecting and weatherproofing
Once everything is screwed together, it's time for the finishing touches. Start by sanding down all the cut edges. Then sand the seat, armrest, backrest and fronts. Pay particular attention to areas where hands, legs or cushions will make contact. The FUXTEC cordless multi-sander helps you reach corners and transitions cleanly too.
After sanding, remove all the dust thoroughly. Only then apply your wood protection. For outdoor use, wood stain, oil or a suitable paint all work well. Stain lets the grain show through, while paint gives a solid block of colour. What matters most is that all cut edges, undersides and joints are treated, since that's exactly where moisture gets in fastest.
If the garden lounge is staying outdoors permanently, protect the feet and any points touching the ground too. The risk is lower on gravel or paving slabs than on grass, but careful treatment is still worthwhile. The back of the backrest should be treated as well, even though you'll barely see it later.
Allow plenty of drying time before adding the cushions. Freshly treated wood can otherwise transfer colour or odour onto the cushions. After the first season, check whether the surface needs re-treating. That's how the lounge stays sturdy and good-looking for years to come.
Cushions, lighting and small patios: giving your garden lounge a personal touch
Now comes the part that turns the construction into a proper relaxation spot. The cushions should suit the size of the pallets and ideally be designed for outdoor use. Look for removable covers or fabrics that dry quickly. If you're not using weatherproof cushions, store them somewhere dry when it rains.
For the colour scheme, take your cue from what's already there. Natural tones sit well with wood, gravel and planting. Light-coloured cushions give the lounge a summery feel, while darker colours are more forgiving. A few accent colours are plenty — too many patterns and colours can disrupt the calm character of the seating area.
Lighting makes a real difference too. Fairy lights along the privacy screen, small solar spotlights in the border, or lanterns on the armrest all create a relaxed atmosphere. Combined with your homemade fire pit, these little touches lead to some genuinely lovely evenings outdoors. This is exactly where you see why the garden lounge is the fitting finale to the DIY series: it ties all the elements together and makes the garden truly usable.
On a small patio, you can scale the concept down. Instead of the L-shape, build just one straight module with an armrest and a narrow side table. On a balcony, check load limits, available space and fire safety rules before you start. A real fire pit doesn't belong there, but with lighting, plants and compact seat cushions you can still create a lovely little outdoor lounge.
Garden lounge, garden sofa or ready-made lounge sets: why build it yourself?
Of course, you can buy a ready-made lounge set. There are models in aluminium, rattan, poly rattan or plastic, often sold as a complete set with a table and armchairs. That's convenient, but not always the right fit if you've already built a DIY fire pit, a garden bench and an outdoor bar. Ready-made furniture can sometimes look too polished or too disconnected from everything else you've built.
Building it yourself means you decide the dimensions, shape and finish. You can tailor the lounge precisely to your garden, make use of existing nooks, and match the design to your earlier projects. It also changes your relationship with the furniture itself. You're not just sitting on shop-bought garden furniture, but in a space you've planned and built piece by piece.
A self-built garden sofa made from pallets and timber boards is also very flexible. As your garden changes, you can rearrange modules, add to them, or re-clad them. If you eventually need a bigger table, simply add one. If more guests are coming round, move the garden bench closer to the fire pit. That way, your seating area stays alive and adaptable.
Wrapping up: the garden lounge as the final module of your outdoor oasis
With this guide, you've built more than just another place to sit. The garden lounge is the connecting piece of your DIY garden zone. The fire pit provides warmth and a focal point, the outdoor bar provides drinks and surface space, the wooden privacy screen provides structure and calm, the garden bench provides extra seating. The lounge turns all of that into a place where you can truly enjoy your garden to the full.
If you plan carefully, use sturdy pallets, clad the fronts and protect every edge thoroughly, you'll end up with a long-lasting project that offers real comfort. At the same time, the build stays simple enough that FUXTEC cordless power tools will help you get it done in a single weekend.
What you're left with is a beautifully finished outdoor oasis that fits your everyday life: coffee in the morning, reading in the afternoon, evenings with friends by the fire pit. That's exactly why it's worth building your garden lounge yourself rather than just buying one.
Discover our range of garden tools

How long does it take to build a garden lounge from pallets?
A basic L-shaped garden lounge can be completed in a single weekend with cordless power tools. The time depends on the size, complexity of the cladding and finish, but the core assembly of stacked pallets, backrest and front boards typically takes 6–8 hours of active work.
What pallets should I use for a garden lounge?
Use new, clean Euro pallets or sturdy solid-wood pallets rather than used ones, since you never know what used pallets transported. New pallets ensure your lounge looks good season after season and doesn't absorb moisture as quickly. Plan for around six to eight pallets depending on whether you build the backrest from pallet pieces or timber boards.
Can I build a garden lounge on grass or just on a patio?
You can build on grass, but a firm, level surface works best to keep the pallets dry and the furniture stable. On grass or bare earth, lay paving slabs, path slabs or a compacted gravel bed underneath. This prevents moisture absorption, keeps the base level and helps the wood last longer through the seasons.
What angle should the backrest be at?
The backrest should lean back slightly for comfort, but there's no exact angle to calculate. What matters is that it's consistent across all modules and supports your back properly when a cushion is in place. Test the seating position before permanently fixing the backrest to make sure it feels right.
How do I weatherproof a wooden garden lounge?
Sand all visible surfaces and edges thoroughly, then apply wood stain, outdoor oil or paint—making sure to treat cut edges, undersides, joints and the back as well, since moisture enters fastest there. Allow plenty of drying time before adding cushions, and check the finish after the first season to see if re-treatment is needed.
Can I make a garden lounge smaller for a balcony?
Yes, the modular design scales down easily. For a small space, build just one straight module instead of the L-shape, or add a narrow side table. Always check your balcony's load limits, available space and fire safety rules before starting. A real fire pit doesn't belong on a balcony, but cushions, lighting and plants create a cosy lounge atmosphere.
What's the difference between building a lounge and buying a ready-made one?
A self-built lounge lets you tailor dimensions, shape and finish exactly to your garden and match your DIY fire pit, bench and bar. You can rearrange and extend modules later as your garden changes, and you'll have a stronger connection to the space than with shop-bought furniture. A ready-made set is more convenient but often looks disconnected from bespoke garden projects.
More articles about garden care

Trockenheit im Garten: Boden lockern, richtig gießen und mit Mulch Wasser sparen
Du gießt das Beet, doch das Wasser bleibt auf der harten Erdoberfläche stehen oder läuft zur Seite ab. Schon nach kurzer Zeit wirkt der Boden wieder trocken, obwohl Du gerade erst zur Gießkanne g...

Pine Bark Mulch: The Complete Gardening Guide
Mulching with pine bark is one of the most effective methods in modern gardening and sustainable horticulture. A layer of mulch material is applied to the soil surface to protect and improve the so...

Spring Soil Improvement: Prepare Your Garden Soil
Inhaltsverzeichnis Warum Bodenverbesserung im Garten im Frühjahr so wichtig für einen gesunden Gartenboden ist Gartenboden nach dem Winter prüfen: Bodenstruktur, Verdichtung und Bodenart erke...


