

Build a Fire Pit in Your Garden: Step-by-Step Guide
How to Build a Fire Pit in Your Garden: Creating a Cosy Outdoor Gathering Spot
A fire pit in your garden is a real game-changer. Whether it's during long summer evenings, cool autumn days, or a relaxed get-together with family and friends, a garden fire pit quickly becomes the centrepiece of the garden.
It doesn't always have to be a shop-bought fire bowl or a ready-made solution from the DIY store. If you build your own fire pit, you can tailor the size, design and location exactly to your own preferences. At the same time, you create an individual project that adds lasting value to your garden.
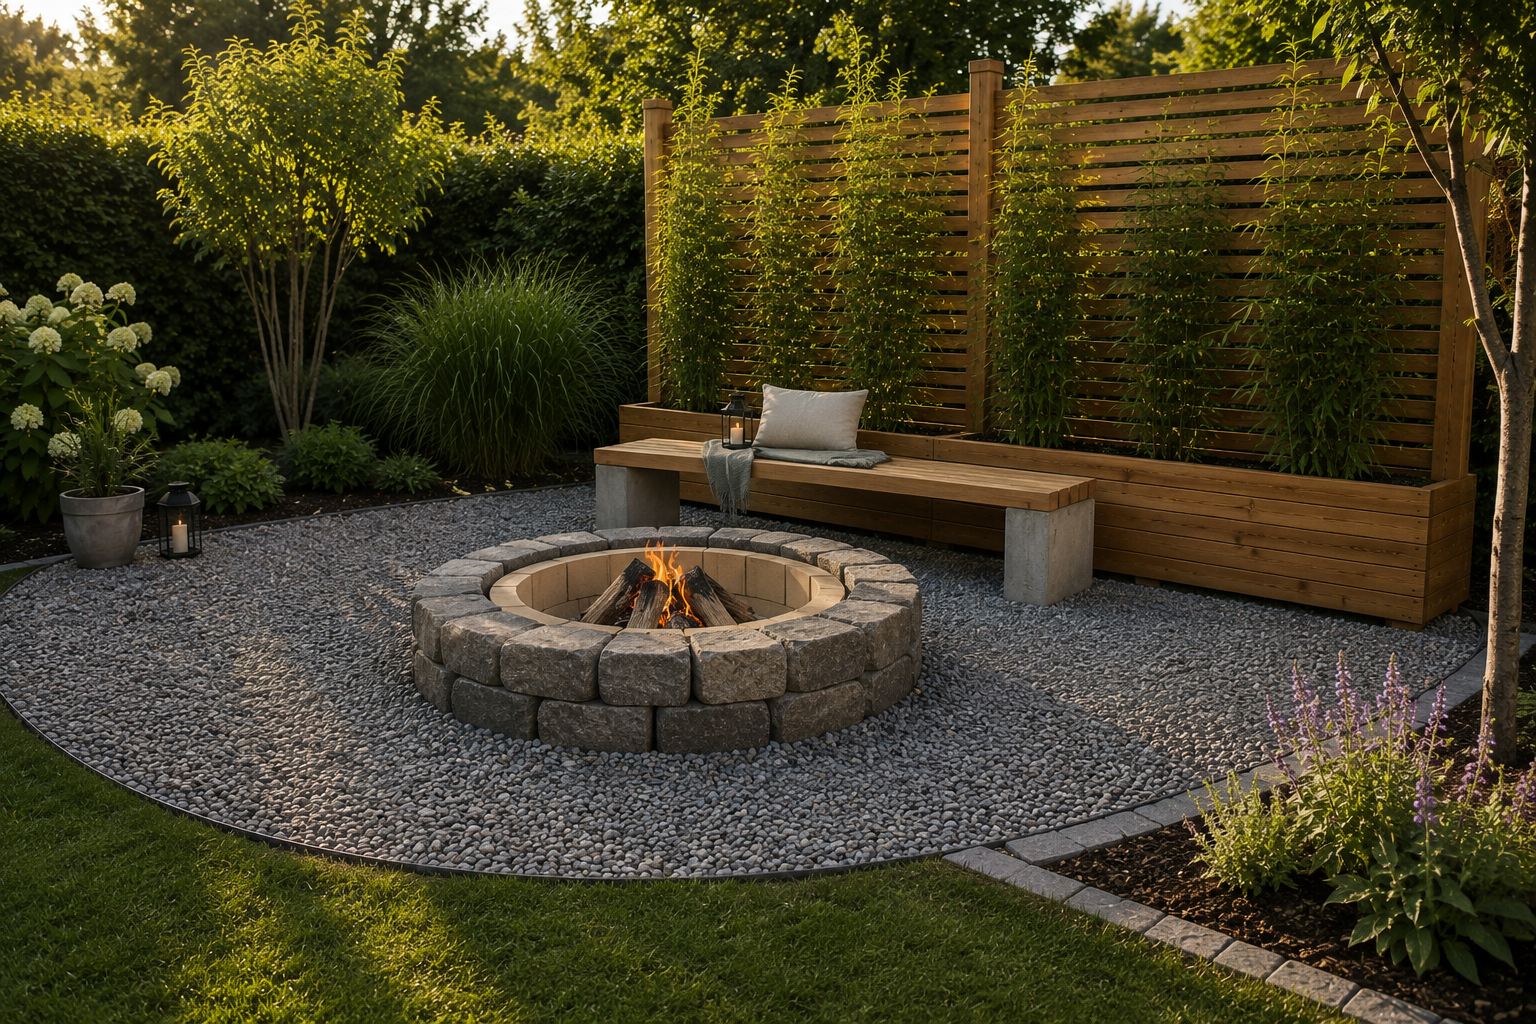
In this FUXTEC garden guide, we'll show you how to build a modern fire pit from natural stone. The design combines a fire-resistant inner ring, a decorative gravel area and a cosy seating zone. We'll also plan a space for firewood right next to the fire pit. The result is a well thought-out fire feature that not only looks great but is practical too.
Why a fire pit adds value to your garden
A well-planned fire pit brings several benefits. It creates a natural gathering point and extends the time you can spend outdoors. Even as temperatures drop in the evening, the fire provides pleasant warmth.
What's more, a garden fire pit can be designed to perfectly match your existing style. Natural stone, for example, looks timeless and works well with both modern and more naturalistic gardens.
Unlike portable options, a permanently built fire pit stays in place for good. This creates a clearly defined area for cosy evenings, barbecues, or a classic garden bonfire.
A fire pit looks especially attractive when surrounded by gravel areas, borders or a small seating group. This creates a zone that structures the garden while also serving as a retreat.
What are the rules for fire pits in UK gardens?
Before you start building, it's worth taking a moment to check the legal side of things.
Whether a fire pit is allowed in your garden depends on several factors, including its size, how it's built, and any local restrictions that may apply.
Smaller fire pits for open fires are generally fine in most UK gardens, as there's no specific national ban on having a bonfire or fire pit at home. However, some local authorities have by-laws restricting bonfires, and if you live in a smoke control area, you're legally required to burn only smokeless fuels or dry, well-seasoned wood to avoid excessive smoke. It's also worth checking your property deeds or any restrictive covenants, as some housing developments prohibit open fires altogether. If in doubt, a quick call to your local council will clear things up.
The choice of fuel is also important. Only dry, untreated wood should be burned. Garden waste, painted boards or other treated materials have no place in a fire pit.
The distance to buildings, hedges and other combustible materials also plays a key role. A fire pit should never be built directly next to wooden sheds, summerhouses or dense vegetation. It's also good practice, and considerate to neighbours, to avoid lighting fires on very windy days or late in the evening, since smoke and noise nuisance can fall under local nuisance regulations.
Choosing the right spot for your fire pit
The location has a major impact on how pleasant and safe the fire pit will be to use.
The ideal spot for a fire pit is on level ground with plenty of distance from buildings and plants. At the same time, the area should be as sheltered from wind as possible.
Shielding a fire pit from the wind reduces sparks and results in calmer flames. It also makes things more comfortable for everyone sitting around the fire pit later on.
Where possible, the fire pit should be within sight of the patio. This keeps walking distances short, so drinks, blankets or barbecue accessories are always close at hand.
At FUXTEC, we also recommend planning the area generously from the outset. If you later want to add extra seating or a small barbecue area, you'll have plenty of room to do so.
Material list for the FUXTEC natural stone fire pit
Our version only requires a handful of materials:
| Material | Use |
|---|---|
| Fire bricks | Heat-resistant inner ring |
| Natural stone or granite setts | Outer ring |
| Gravel | Surface design |
| Hardcore/crushed stone | Sub-base layer |
| Weed-suppressant membrane | Protection against weed growth |
| Fireclay mortar or heat-resistant mortar | Bonding the stones |
| Log store or natural stone | Wood storage |
The inner area of the fire pit is built entirely fire-resistant. Fire bricks are particularly well suited for this, as they withstand high temperatures over the long term.
Step 1: Mark out the area and dig the fire pit
First, mark out the desired size on the lawn. A diameter of around 100 to 120 centimetres works well for most gardens. This leaves enough room for a comfortable fire without the setup taking up too much space.
For an even circle, place a wooden stake in the centre and attach a length of string to it. This simple method lets you trace the circumference precisely.
Next, remove the turf and dig out the area to a depth of around 25 to 30 centimetres. At the same time, clear an additional strip of about 50 centimetres around the fire pit itself. This is where the gravel area will go later on.
Already at this stage, you can see how the finished fire pit will take shape in your garden. The generous surface area will give the finished feature a higher-quality look and help it blend more harmoniously into its surroundings.
Step 2: Lay a gravel bed as the foundation
For the fire pit to stay stable in the long run, it needs a load-bearing base.
First, lay a weed-suppressant membrane in the excavated area. Then add a layer of hardcore roughly 10 to 15 centimetres thick and compact it. You can do this with a tamper or, much more easily, with our FUXTEC plate compactor.
This is followed by a layer of gravel, which also acts as drainage. This allows rainwater to drain away easily instead of pooling inside the fire pit.
A stable base prevents the ground from settling later on and ensures the stones stay firmly in place for years to come.
This step is especially important if you're building your own garden fire pit and want it to last.
Step 3: Build the inner ring from fire bricks
The inner ring is built from heat-resistant fire bricks. These bricks store heat extremely well and are specifically designed to withstand high temperatures.
Arrange the bricks in a circle, checking the alignment regularly as you go. For extra stability, the bricks can be bonded with heat-resistant mortar.
The entire inner area must be consistently fire-resistant. Standard paving blocks or concrete blocks are only partly suitable here, as they can be damaged by the high temperatures.
The finished inner ring later forms the actual burn chamber and helps keep the heat contained and controlled.
Step 4: Build the outer ring from natural stone
A second ring made of natural stone is built around the fire brick ring. Granite, basalt or other robust natural stones work particularly well here.
Try to lay each stone as evenly as possible. This gives the finished fire pit a high-quality look and makes the whole construction appear far more professional.
If you prefer, you can build the entire structure with mortar. Our version, however, combines loose natural stones with a stable inner ring. This makes later adjustments easier and gives the fire pit a more natural feel.
The result is a modern, built-in fire pit that's both functional and decorative.
Step 5: Design the gravel area and seating zone
Once the actual fire pit is finished, it's time to design the surrounding area.
This part is what will determine whether you actually enjoy using your open fire pit or not, so the area around it should be planned generously.
Start by spreading a further layer of gravel around the fire pit. This area serves several purposes: it looks decorative, improves drainage, and creates a safe buffer zone between the fire and the lawn.
Make sure the gravel is spread evenly and forms a neat transition to the rest of the garden. This creates a harmonious look and keeps the ground around the fire pit low-maintenance in the long run.
Next, you can design the actual seating area. A permanently fitted wooden bench works particularly well for a cosy atmosphere.
For inspiration, we recommend our detailed guide on how to build a garden bench yourself. There, we show you step by step how to make a sturdy wooden garden bench that's the perfect match for a fire pit. A hand-built bench looks far more individual than shop-bought furniture and fits beautifully into the overall design.
For extra wind protection and more privacy, the area can also be complemented with a DIY privacy screen. In our guide "How to build a wooden privacy screen", we show you step by step how to build a modern wooden screen with an integrated planter. Combining a fire pit, garden bench and privacy screen creates a sheltered retreat that makes the seating area feel much cosier.
Which stones are suitable for a fire pit?
Not every stone can withstand high temperatures over the long term. In open fire pits especially, temperatures inside the burn chamber can quickly reach several hundred degrees. Materials not designed for this can crack, split, or in the worst case even explode.
Fire bricks are therefore the best choice for the direct fire area. These specialist fire-resistant bricks are also used in fireplaces, ovens and barbecues. They store heat very well, are extremely heat-resistant, and can withstand the sharp temperature changes that occur when lighting and later cooling down.
For the outer ring, natural stones such as granite or basalt are good options. Both are very robust and give the fire pit a high-quality look. Certain clay pavers can also be used, provided they're specifically rated for high temperatures. Although the outer ring doesn't come into direct contact with the flames, it's still regularly exposed to heat and should therefore be made from a durable material.
Highly porous stones such as some sandstones, limestones or decorative ornamental stones of unknown origin are less suitable. Moisture can collect in their pores, and when suddenly heated to high temperatures, this can cause cracking or cause pieces to split off.
If you're planning a natural stone fire pit, it's worth choosing high-quality materials from a specialist supplier. They can usually tell you about heat resistance and give you confidence that the stones are suitable for use in a fire pit. This way, your fire pit stays not only attractive but also safe and durable for years to come.
Built-in fire pit or fire bowl?
Anyone planning to build their own fire pit often faces the question of whether a permanent feature or a portable solution makes more sense.
A fire bowl offers maximum flexibility. It can be moved at any time and requires no construction work.
A permanently built fire pit, on the other hand, looks far more high-end and blends better into the overall garden design. If you're planning to use the area long-term, a built-in solution is often the more appealing choice.
Of course, fire bowls and fire baskets have their place too. They can be a great option, especially for smaller gardens or patios.
Our fire pit combines the charm of a classic bonfire with the look of a permanent garden feature.
Step 6: Create a firewood storage area next to the fire pit
So you're not constantly walking back and forth to the log store, it's worth setting up a small firewood area right next to the fire pit.
Plan a spot near the fire pit that stays dry but is still a safe distance from the fire itself. The wood should be easy to reach, but must not be stored directly against the hot stones.
A small log rack made of wood or metal is particularly practical. Alternatively, you can build a decorative natural stone border to visually separate the storage area from the rest of the feature.
Make sure firewood is always stored somewhere dry. Damp wood produces far more smoke and burns much less efficiently.
What wood is best for a fire pit?
Choosing the right firewood has a big impact on heat output, smoke, and sparks.
Dry hardwood works particularly well for a garden fire pit. Beech, ash or oak burn slowly and evenly and produce a lovely bed of embers.
Only use dry, untreated wood wherever possible. Painted boards, coated offcuts or other treated materials have no place in the fire.
Softwood can also be used, though its higher resin content tends to produce more sparks. For a relaxed evening by the fire, many garden owners therefore prefer classic hardwoods.
If you need firewood regularly, it can be worth processing larger quantities yourself.
Making your own firewood with the FUXTEC FX-HS26 log splitter
If you use your fire pit regularly, you'll need a fair amount of firewood over the course of the year.
Instead of buying ready-split logs, you can make your own firewood and save money in the process. Larger sections of trunk are also much easier to store and transport than wood that's already been split.
The FUXTEC FX-HS26 log splitter is ideally suited to this task. With 7 tonnes of splitting force, it reliably processes logs up to 520 mm in length and up to 250 mm in diameter, with minimal time and effort. The powerful 2.3 kW motor, combined with the hydraulic cylinder with automatic return, ensures an efficient workflow.
Thanks to the infinitely adjustable splitting stroke, the machine can be flexibly adapted to different log sizes. The torsion-resistant, powder-coated steel frame provides stability and durability, while the two-handed operation ensures a high level of safety while working. The log splitter is also low-maintenance and takes up very little space.
After splitting, the wood should be stored somewhere airy and sheltered. Only once it's properly seasoned is it ideal for use in the fire pit.
Firewood for cosy evenings by the fire
To keep your fire pit ready to go whenever you need it, it's worth keeping a good stock of dry firewood on hand. With the FUXTEC FX-HS26 log splitter, you can prepare your own firewood with ease and keep a well-stocked wood store right by the fire.

Never run short of firewood again
With the FUXTEC FX-HS26 log splitter, you can easily prepare your own wood supply for fire pits, fire bowls and bonfires.
Fire pit safety
When it comes to fire, safety always comes first.
Only use suitable firewood and keep enough distance from buildings, trees and other combustible materials. In particular, avoid lighting a fire in strong winds, as flying sparks can quickly cause problems.
A water source or a bucket of water for putting out the fire should always be kept nearby.
Children should never be left unsupervised near a fire pit, and pets should be kept at a safe distance too.
Also make sure the ground beneath the fire pit is permanently fire-resistant. This prevents heat from spreading to the surrounding areas.
Common mistakes when building a fire pit
Many problems start right at the planning stage.
One common mistake is leaving too little safety distance from buildings or plants. Using unsuitable stones that can't withstand the high temperatures is another frequent issue.
A poorly prepared base can also lead to the ground settling over time, so the sub-base layer should be built up carefully.
If you're building your own fire pit at home, it's also worth allowing enough space for seating, firewood storage and room to move around. This makes the whole feature feel far more generous and comfortable.
Conclusion: A fire pit creates a special place in your garden
A well-planned fire pit brings warmth, cosiness and garden design together in a special way.
Our version combines a natural stone fire pit, a generous gravel area and a practical firewood storage zone into one well thought-out overall concept. The result is a feature that goes far beyond a simple fire pit.
At FUXTEC, we've found that projects like this add lasting value to a garden. The fire pit quickly becomes the heart of the garden, creating a place where people love to gather. If you'd also like a lovely barbecue corner in your garden, take a look at our guide "How to build your own barbecue shelter" and turn your garden into a true outdoor haven.
Discover our range of garden tools
Do I need permission to build a fire pit in my UK garden?
You generally don't need specific permission for a small domestic fire pit in most UK gardens, but it's essential to check your local council's by-laws and any restrictive covenants on your property deeds. If you live in a smoke control area, you must burn only smokeless fuels or dry, well-seasoned wood to comply with regulations.
What's the best diameter for a garden fire pit?
A diameter of around 100 to 120 centimetres works well for most gardens, as it leaves enough room for a comfortable fire without taking up excessive space or dominating the garden layout.
What materials do I need to build a fire pit?
You'll need fire bricks for the heat-resistant inner ring, natural stone or granite setts for the outer ring, gravel for surface design, hardcore as a sub-base, weed-suppressant membrane, heat-resistant mortar, and optional materials for a log store and seating area.
Can I use any stone for a fire pit?
No, only heat-resistant stones should be used. Fire bricks are essential for the inner burning chamber, whilst granite and basalt work well for the outer ring. Avoid porous stones like sandstone or limestone, as moisture trapped in their pores can cause cracking when exposed to high heat.
What type of wood is best for burning in a fire pit?
Dry hardwoods such as beech, ash or oak are ideal as they burn slowly and evenly, producing a lovely bed of embers. Always use dry, untreated wood only, and avoid painted or coated materials that produce harmful fumes.
How far should a fire pit be from my house or garden buildings?
A fire pit should never be built directly next to wooden sheds, summerhouses or dense vegetation. The exact distance depends on local regulations, so it's best to check with your council, but a generous safety distance is always recommended to prevent heat damage.
Do I need a proper foundation for a permanent fire pit?
Yes, a stable base is essential for long-term durability. Lay a weed-suppressant membrane, add 10 to 15 centimetres of compacted hardcore, and follow with a gravel layer for drainage to prevent the ground from settling and keep stones firmly in place.
More articles about garden care
Trockenheit im Garten: Boden lockern, richtig gießen und mit Mulch Wasser sparen
Du gießt das Beet, doch das Wasser bleibt auf der harten Erdoberfläche stehen oder läuft zur Seite ab. Schon nach kurzer Zeit wirkt der Boden wieder trocken, obwohl Du gerade erst zur Gießkanne g...

Pine Bark Mulch: The Complete Gardening Guide
Mulching with pine bark is one of the most effective methods in modern gardening and sustainable horticulture. A layer of mulch material is applied to the soil surface to protect and improve the so...

Spring Soil Improvement: Prepare Your Garden Soil
Inhaltsverzeichnis Warum Bodenverbesserung im Garten im Frühjahr so wichtig für einen gesunden Gartenboden ist Gartenboden nach dem Winter prüfen: Bodenstruktur, Verdichtung und Bodenart erke...


