


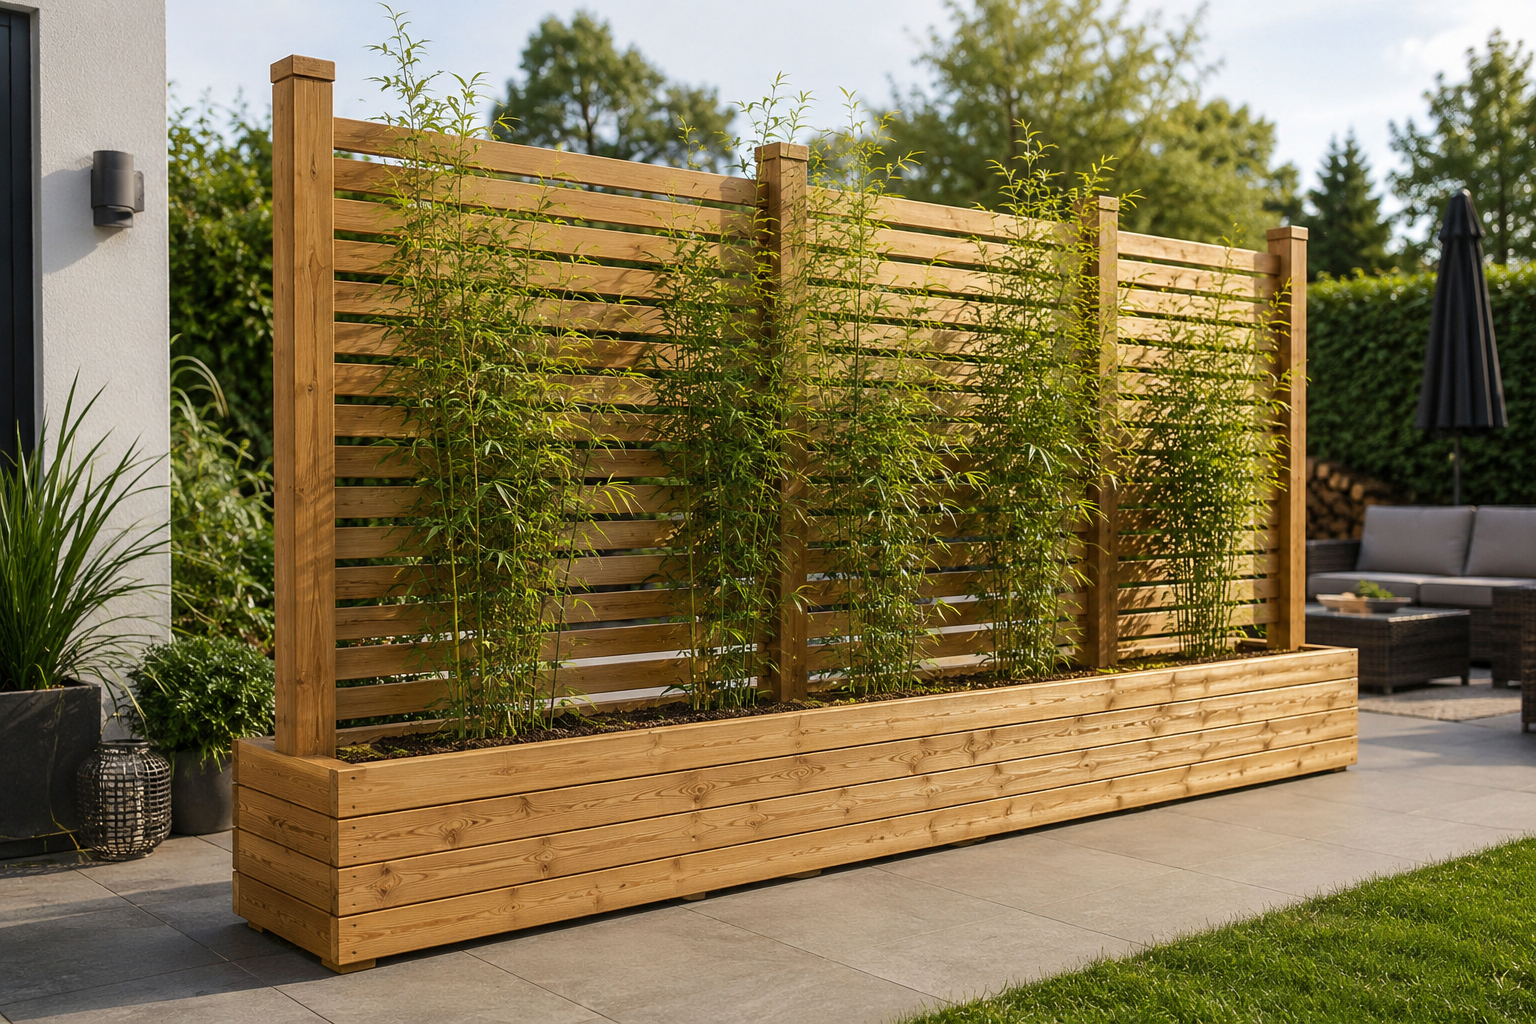
Build a DIY Wooden Privacy Screen with Planter Box
A good privacy screen creates a sense of retreat. It shields you from prying eyes, adds structure to your garden, and makes a patio or seating area feel far more welcoming. Even better when the solution is not only functional but also adds a decorative touch.
That's exactly why we're sharing a slightly different approach in this FUXTEC garden guide — rather than the standard privacy fencing you'll find in so many gardens. Instead of a plain fence, you'll be building a modern privacy screen with an integrated planter box. This gives you not just a screened area, but also space for bamboo, grasses, or other plants.
The great advantage: you can build this wooden privacy screen yourself, without pouring concrete foundations or permanently altering the ground. This makes the construction suitable for both the garden and the patio.
If you want to build your own privacy screen and care about a contemporary look, you'll find the right solution here.
Why a Privacy Screen with a Planter Box is Such a Clever Idea
A standard fence does the job. A planted privacy screen offers so much more.
The planter box serves as both the base for the structure and creates extra space for planting. This makes the whole thing feel more natural than a purely wooden privacy panel.
In contemporary gardens especially, this creates an attractive combination of timber and plants. The privacy screen blends harmoniously into the surroundings whilst providing greater privacy.
This solution also works well on smaller plots. Whilst a tall hedge can take several years to become sufficiently dense, the timber frame offers immediate screening.
For anyone who enjoys DIY, this project is also a rewarding alternative to ready-made privacy panels from the garden centre or DIY store.
Planning Your Garden Privacy Screen Properly
Before you start building, decide on your desired dimensions.
First, measure the area you want to screen off. A tape measure and a spirit level will help. Note down all the key measurements and sketch out a simple plan.
In our example, we're building a freestanding privacy screen approximately 180 cm tall and 200 cm wide.
Also make sure there's enough room for the planter box. This will provide part of the structure's stability and should therefore be generously sized.
If the privacy screen will be close to your property boundary, it's worth having a quick word with your neighbour beforehand. It's also advisable to check your local planning regulations. In England and Wales, most garden structures under 2 metres in height do not require planning permission, but you should always verify this with your local planning authority, particularly if you're in a conservation area or the screen is on or near a boundary.
Materials and Tools for a Wooden Privacy Screen
Materials and Tools
For our privacy screen you'll need the following materials:
| Material | Use |
|---|---|
| Douglas fir boards | Planter box |
| Feather-edge or square-edged timber battens | Privacy screen surface |
| Structural timber posts | Load-bearing structure |
| Stainless steel screws | Long-lasting fixings |
| Wood preservative stain | Weather protection |
| Weed-suppressing membrane | Planter box lining |
| Potting compost | Filling |
For the timber, we recommend Douglas fir or larch. Both species are excellent for outdoor use and far more durable than, for example, spruce.
For the load-bearing elements, sturdy structural timber posts are best. A long length of timber can easily be cut to size with the right saw.
Make the Build Easy with These FUXTEC Power Tools
The Right Tools for Your Wooden Privacy Screen
With the right tools, building a modern privacy screen becomes significantly easier. Here you'll find suitable FUXTEC products for cutting, assembly, surface finishing, and long-term wood protection.

Cordless Drill Driver
Ideal for screwing together posts, timber battens, and the entire planter box construction of your privacy screen.

Rotary Hammer Drill
Perfect for pre-drilling hardwood and for fixings into paving slabs or solid surfaces around the privacy screen.

Cordless Jigsaw
Ideal for cut-outs, adjustments, and precise cuts on battens, boards, and privacy screen elements.

Cordless Circular Saw
For fast, clean cuts through structural timber, battens, and boards for the planter box and privacy screen panel.

Cordless Multi-Tool Sander
For smoothing cut edges, rounding off corners, and achieving a quality finish before applying wood protection.

Cordless Garden Sprayer
Ideal for applying stain and wood preservative evenly across large privacy screen surfaces and hard-to-reach spots.
With the right tools, the project not only goes faster but also more precisely.
For cutting boards and timber battens, we recommend the FUXTEC cordless circular saw. Adjustments and cut-outs are particularly straightforward with the cordless jigsaw.
For pre-drilling and screwing, the FUXTEC cordless drill driver is excellent. If you want to fix the privacy screen to paving slabs or a solid surface, a powerful drill or cordless rotary hammer may also be useful.
For the later surface finishing, the FUXTEC multi-tool comes into its own. The stain can then be applied especially evenly using the cordless hand sprayer.
Step 1: Build the Planter Box as a Base
The first step creates the foundation of the structure.
Cut the boards for the planter box to the desired length. The side panels are then joined together using stainless steel screws.
Make sure all boards are neatly aligned and the edges are as flush as possible. This gives the finished project a far more professional appearance.
The finished planter box should be large enough to hold compost and plants. At the same time, it acts as the base for the entire structure.
Step 2: Fit the Posts for Your Privacy Screen
Once the planter box is complete, the load-bearing posts for your privacy screen can be fitted.
For our build, we're using four sturdy structural timber posts. These are screwed directly into the planter box and will be further stabilised later by the filled compost.
First, cut the posts to your desired height. Heights of between 180 and 200 cm have proved ideal for a comfortable degree of privacy screening.
Then use a spirit level to check that every post is perfectly vertical. Even small deviations can result in the entire structure looking wonky later on.
Then fix the posts to the planter box. Use the FUXTEC cordless combi drill and high-quality stainless steel screws for this. Every screw should be driven in cleanly and countersunk flush.
For extra stability, you can add additional bracing inside the planter box. This keeps the structure reliably stable even in windy conditions.
Step 3: Cut and Prepare the Timber Battens
Now for the actual privacy screen itself.
For the cladding, classic timber battens, tongue-and-groove boards, or narrow planks all work well. Diagonal or square-edged battens in particular give a contemporary look whilst also allowing some air circulation.
Measure the required length and cut each batten to size. The most precise cuts come from the FUXTEC cordless circular saw. For adjustments at corners or tricky spots, the cordless jigsaw is the tool of choice.
All cut edges should then be sanded. This prevents splinters and ensures a pleasant, smooth surface.
Anyone building their own privacy screen should take their time with this step. Clean, accurate cuts make a significant difference to the final look.
Step 4: Assemble the Privacy Screen Panel
Now the individual battens come together to form a finished privacy screen panel.
Start at one outer edge and work your way up steadily. A consistent gap should be maintained between each batten.
The easiest way to achieve this is with a small spacer block, which you place between each element as you work.
Make sure all elements have the same spacing between them. This creates a neat, uniform appearance.
Use your spirit level regularly throughout the work and keep checking the alignment of the structure.
In our project, the battens are fitted horizontally. This gives the privacy screen a modern, quality look. Alternatively, you can fix the elements vertically if that suits your garden better.
Once all the battens are secured, the result is a near solid privacy screen that reliably shields you from prying eyes.
Step 5: Sand the Surfaces and Round Off the Edges
After assembly comes the finishing work.
The FUXTEC cordless multi-tool is used to work all edges and surfaces. Cut ends and corners in particular benefit from a thorough sanding.
Take your time with this step. A high-quality surface not only improves the look but also extends the lifespan of the wood.
Also check all screw heads. These should be fully countersunk and pose no risk of injury.
Step 6: Stain and Protect the Privacy Screen
To keep your privacy screen looking great for many years, you should protect the wood afterwards.
You can either oil or stain the wood. Both options protect against moisture and UV damage.
For large surfaces, we recommend the FUXTEC cordless hand sprayer. This allows the stain to be applied particularly evenly.
Work in long, steady strokes and ensure all surfaces are fully covered. Cut ends and end grain in particular need careful protection.
Regular staining keeps the wood durably resistant and preserves its natural appearance.
Which Plants Are Best for the Planter Box?
The planter box is what sets this apart from an ordinary garden fence and turns it into a real focal point.
Particularly well-suited plants include:
| Plant | Benefit |
|---|---|
| Bamboo | Fast-growing and provides year-round screening |
| Miscanthus (Pampas-style grass) | Contemporary look and low maintenance |
| Lavender | Fragrant and bee-friendly |
| Hydrangeas | Lush blooms in summer |
| Clematis | Attractive climbing plant |
| Evergreen grasses | Year-round screening |
Bamboo in particular provides an especially natural-looking privacy screen in a relatively short space of time.
Various climbing plants can also add greenery to the structure and enhance its visual appeal.
Alternative Foundation Solutions for Larger Projects
In this project, the planter box replaces a traditional foundation.
For larger structures or very exposed, windy locations, however, other solutions may be more appropriate. Options here include bolt-down post supports, concreted-in fence posts, or solid pad foundations.
These options are commonly used for larger fences or freestanding structures.
For most private gardens, however, the planter box solution is more than sufficient and is considerably quicker and simpler to put together.
Building Your Own Privacy Screen is Well Worth It
A ready-made privacy screen from a DIY store does the job. But anyone who builds their own privacy screen can tailor the size, design, and planting exactly to their own wishes.
The result is a unique project that's not only functional but also genuinely impressive to look at.
Especially if you already enjoy working in the garden or have previously built a pergola, raised beds, or other garden furniture, this project fits in perfectly.
How to Keep Your Privacy Screen Looking Great for Years
Once the build is complete, the real enjoyment begins. With a little maintenance, your privacy screen will remain attractive and functional for many years to come.
Inspect the timber at least once a year for damage or areas of heavy wear. In particular, the areas around the screw fixings and the lower sections of the structure are constantly exposed to moisture.
Depending on the weather conditions, it's advisable to re-treat the surface every two to four years. A fresh coat of stain or oil protects the wood against UV rays and moisture and significantly extends its lifespan.
Also make sure that no standing water builds up in the planter box. A drainage layer of gravel or lightweight expanded clay aggregate (LECA) will reliably drain away any excess water.
Anyone who maintains their privacy screen regularly will enjoy it for many years to come.
Legal Considerations Before You Build
Before starting the project, it's worth taking a moment to check the relevant local regulations.
Rules regarding garden structures can vary depending on your local authority, and are particularly relevant when the privacy screen is positioned directly on or near a property boundary.
In many cases, garden structures up to a certain height are permitted development and do not require planning permission. That said, it's always worth a quick check of your local council's planning guidance.
If you're in any doubt, a quick call to your local planning department will usually point you in the right direction.
If the privacy screen is immediately adjacent to a neighbouring property, an open conversation with your neighbour is also a good idea. This can often prevent misunderstandings and potential disputes further down the line.
Common Mistakes When Building Your Own Privacy Screen
Although this project is straightforward in principle, there are a few typical mistakes worth avoiding.
A common error is building the structure too lightly. The posts must be sufficiently robust to ensure the structure remains stable even in windy weather.
Equally important is the choice of timber. For outdoor use, it's best to opt for durable species such as Douglas fir or larch.
Uneven gaps between the battens can also spoil the overall look. So use spacer blocks consistently and check regularly with your spirit level.
Finally, wood protection should never be neglected. A good quality stain is one of the most important steps if you want to maximise the lifespan of your privacy screen.
Summary: A Modern Wooden Privacy Screen with Planter Box
A privacy screen doesn't have to be made from standardised, off-the-shelf components. With an integrated planter box, you get a contemporary solution that combines functionality with design.
The privacy screen reliably shields you from prying eyes, creates greater privacy in the garden, and simultaneously offers space for an attractive planting scheme. Bamboo, ornamental grasses, or flowering plants in particular turn this structure into a real showpiece.
At FUXTEC, we've found that projects like these offer the greatest added value. Instead of a purely functional boundary, the result is a bespoke design feature that genuinely enhances the garden.
Thanks to the combination of planter box and timber frame, the privacy screen can be built without complex foundations. This makes the project appealing to DIY enthusiasts looking for a flexible and contemporary solution.
If you enjoy working with wood and love shaping your garden, this project offers a fantastic opportunity to bring together privacy, greenery, and hands-on creativity.
Discover our range of garden tools


Do I need planning permission to build a privacy screen in my garden?
In England and Wales, most garden structures under 2 metres in height do not require planning permission, but this can vary by local authority and is particularly important to check if you're in a conservation area or building near a property boundary. It's advisable to contact your local planning department to confirm what applies to your specific situation.
What's the best height for a garden privacy screen?
Heights between 180 and 200 cm have proved ideal for providing a comfortable degree of privacy screening. The exact height will depend on your specific needs and how much you want to block from view.
Which timber is best for an outdoor privacy screen?
Douglas fir and larch are both excellent choices for outdoor use because they are naturally durable and far more resistant to weather than softwoods like spruce. Structural timber posts should be sturdy and properly treated for longevity.
Can I build a privacy screen without concrete foundations?
Yes, using an integrated planter box as the base is a practical alternative to concrete foundations and works well for most residential gardens. For larger structures or very exposed, windy locations, bolt-down post supports or concreted-in fence posts may be more appropriate.
What plants work best in a privacy screen planter box?
Bamboo, ornamental grasses like Miscanthus, lavender, hydrangeas, clematis, and evergreen grasses are all excellent choices. Bamboo in particular grows quickly and provides year-round screening, whilst climbing plants can enhance the visual appeal.
How often do I need to treat my wooden privacy screen with stain or oil?
It's advisable to re-treat the surface every two to four years depending on weather conditions and the level of wear. Regular staining keeps the wood durable and resistant to UV damage and moisture.
Should I talk to my neighbour before building a privacy screen on the boundary?
Yes, having an open conversation with your neighbour beforehand is a good idea, especially if the privacy screen is immediately adjacent to their property. This can often prevent misunderstandings and potential disputes further down the line.
More articles about garden care
Mulchen mit Pinienrinde: So nutzt du organischen Mulch, um Unkraut zu verhindern
Das Mulchen mit Pinienrinde gehört zu den effektivsten Methoden im modernen Gartenbau und in der nachhaltigen Landwirtschaft. Dabei wird eine Schicht Mulchmaterial auf die Bodenoberfläche aufgebrac...

Bodenverbesserung im Garten: So verbesserst du deinen Gartenboden im Frühjahr für gesunde Pflanzen
Inhaltsverzeichnis Warum Bodenverbesserung im Garten im Frühjahr so wichtig für einen gesunden Gartenboden ist Gartenboden nach dem Winter prüfen: Bodenstruktur, Verdichtung und Bodenart erke...

Richtig Düngen im Garten: Schritt für Schritt erklärt
Inhaltsverzeichnis Warum Düngen im Garten so wichtig ist Bodenanalyse: Grundlage für die richtige Düngung Organische vs. mineralische Dünger: Was ist besser? Kompost, Hornspäne & Co.: Organi...


