


Build Your Own Garden Bench: Step-by-Step Guide
Building your own garden bench is one of those projects that most garden enthusiasts will have on their wish list sooner or later. A bench creates a place to relax, invites you to linger and makes your garden feel even more personal. It's especially rewarding when the bench isn't an off-the-shelf purchase, but something that fits your style and your outdoor space perfectly.
The great advantage: building your own garden bench is achievable without enormous effort. At the same time, you end up with a genuine one-of-a-kind piece that suits your garden and your needs perfectly. Whether it's a cosy seat beneath a tree, a focal point on the patio, or extra seating beside the vegetable patch — the possibilities are almost endless.
In this FUXTEC garden guide, we explain what matters when it comes to planning, which materials have proven their worth, and how to choose the right design for your garden. A detailed step-by-step guide follows, so you can successfully build your own bench.
Choosing the right timber for your wooden garden bench
Your choice of material will largely determine how long you enjoy your bench. If you're planning a wooden garden bench, it's worth being selective rather than reaching for the nearest plank.
For outdoor use, particularly durable timber species have proven their worth. Larch and Douglas fir are especially popular. Both timbers offer naturally good resistance to moisture and are excellent choices for garden projects.
The combination of Douglas fir or larch is favoured by many experienced DIYers. These timbers are easy to work with, have an attractive grain and develop a natural patina over time.
Robinia (false acacia), thermally modified timber and oak are also worth considering. For a classic wooden bench, however, high-quality decking boards or sturdy timber battens in larch or Douglas fir will usually be more than sufficient.
If you prefer a particularly natural look, you can even use a log as your base and craft a rustic garden bench from it. This option has a wonderfully natural character and fits beautifully into wildlife-friendly or cottage-style gardens.
Planning: which garden bench suits your garden?
Before you start the project itself, it's worth spending a little time on planning. A bench will often be with you for many years, so it's all the more important that the size, shape and design are well thought through from the outset.
First, consider where the bench will eventually stand. Beneath a fruit tree it creates a shaded retreat. On the patio it can complement existing garden furniture. In the kitchen garden it provides a spot for a short rest during gardening.
Size also plays an important role. Should the bench seat two people, or would you like a larger bench for the whole family?
When planning, you should also consider the following questions:
- Would you like a backrest?
- Should the bench also have armrests?
- Do you prefer a modern or a more natural look?
- Will the bench be left outside permanently?
- Should additional storage be built in?
A well-planned seat height is usually between 45 and 50 centimetres. This ensures comfortable seating and makes it easy to stand up.
From modern to rustic: which construction style suits you?
There are numerous approaches to building a garden bench.
Classic constructions from beams and planks are very popular. They are relatively straightforward to build and offer excellent stability.
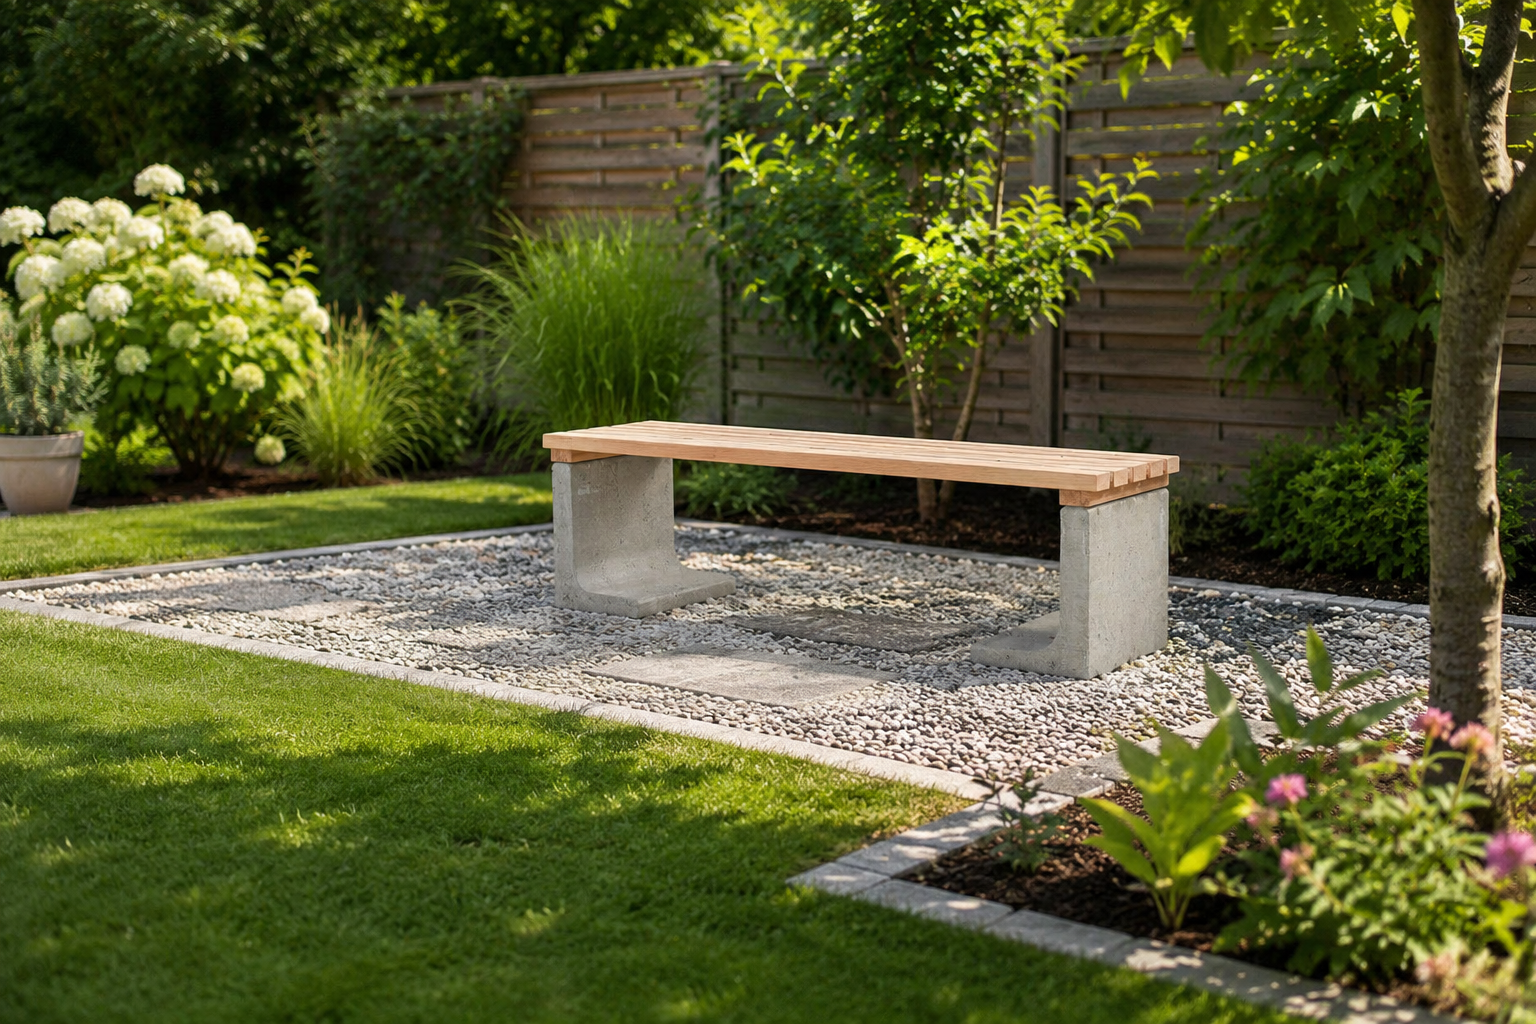
Another interesting idea is a combination of concrete and timber. Here, concrete blocks form the load-bearing base, while the wooden seat provides comfort. This option looks particularly contemporary and suits modern garden designs beautifully.
Pallet constructions are equally popular. With a little creativity, a pallet can be transformed into an individual DIY bench that works brilliantly in relaxed lounge areas.
Anyone who wants to emphasise the natural character of their garden often opts for a simple wooden bench made from solid planks, or even a construction from logs. This creates a piece of furniture with a particularly rustic feel.
Building your own garden bench means maximum creative freedom
The greatest advantage over bought models is individuality. When you plan to build your own garden bench, you can decide every detail yourself.
Width, height, colour and design can be matched precisely to your surroundings. The result is not just a functional seat, but a personal project with real character.
Garden owners who enjoy working with timber or love a good DIY project particularly appreciate this freedom. Instead of an off-the-shelf product, you end up with a handmade garden bench that corresponds exactly to your own vision.
Beyond all that, there's something genuinely satisfying about sitting at the end of the day on a bench you've built with your own hands.
Tools you should have to hand
Good preparation will help everything go smoothly when it comes to assembly.
The Right Tools for Your Garden Bench
Having the right tools makes building your garden bench considerably easier. Here you'll find suitable FUXTEC products for cutting, assembly, sanding and wood protection.

Cordless Drill Driver
Ideal for screwing together the seat, underframe and backrest of your garden bench.

Rotary Hammer Drill
Perfect for pre-drilling timber and creating rawlplug holes in concrete blocks.

Cordless Jigsaw
Ideal for curved cuts, notches and precise adjustments when building your garden bench.

Cordless Circular Saw
For straight, clean cuts through planks, timber battens and decking boards.

Cordless Multi-Tool Sander
For smooth surfaces, clean edges and a splinter-free finish.

Cordless Sprayer
For applying wood stain, paint and wood preservative evenly across larger surfaces.
Materials list for your garden bench
For this build guide, we've based the design on a sturdy wooden bench with concrete feet. The construction is long-lasting, attractive and well within reach of DIYers with limited experience.
Materials
- 2 L-shaped concrete blocks (40 x 40 cm)
- 5 long decking boards for the seat
- 2 short timber battens for the supporting framework
- approx. 30 suitable screws
- 6 rawlplugs
- Wood preservative oil or wood stain
- Paint for a personalised finish
Tools
- Cordless drill driver
- Power drill
- Wood drill bit
- Masonry drill bit
- Spirit level
- Tape measure
- Pencil
- Saw
- Sanding block
- Sandpaper
Pay attention to choosing the right materials when you shop. For outdoor projects in particular, it pays to invest a little more in quality. The extra cost is usually offset by significantly better durability.
Step-by-step guide: building your own garden bench
Now the actual build begins. The construction is based on two concrete supports and a wooden seat, resulting in a bench that is both sturdy and elegant.
Cutting and preparing the timber
Begin by cutting the planks to the desired length.
For a classic bench around 150 centimetres wide, the long planks are cut to size accordingly. The short battens will later serve as the underframe, connecting the seat to the concrete blocks.
For cutting the planks, use your FUXTEC cordless saws. Straight cuts are made quickly and precisely with a circular saw, while a jigsaw is ideal for adjustments and detailed work. This allows timber battens and planks to be cut cleanly to size and prepared perfectly for assembly.
Sanding the edges and preparing the surface
Next, sand all cut edges carefully. The FUXTEC cordless multi-tool allows you to work edges and surfaces quickly and evenly. Take your time with this step — a smooth surface not only gives a high-quality finish, but also prevents splinters forming or timber fibres fraying later on.
The seat itself also benefits from a smooth surface. Nobody wants to sit on a bench that catches clothing or skin.
Pre-drilling and preparing the fixings
Now it's time to prepare the fixings. First, mark the positions of the screws on the short support battens. You should then pre-drill the holes using the FUXTEC cordless hammer drill, so the timber doesn't split later.
Pre-drilling is one of the most important steps in furniture making. With harder timbers such as Douglas fir or larch in particular, it helps to avoid stress in the material and ensures the screws can be driven in cleanly.
Next, transfer the drill points to the concrete blocks and create the necessary holes for the rawlplugs. The FUXTEC cordless rotary hammer drill is recommended for this step, as it delivers precise holes even in harder materials. Check the positions carefully before drilling and align the drill points precisely, so the finished construction sits level and stable.
Assembling the underframe
Once the drilling is complete, insert the rawlplugs.
Then fix the short timber battens to the concrete blocks using your FUXTEC cordless drill driver. These battens form the support for the seat.
During assembly, regularly check with a spirit level that both sides are perfectly aligned.
The construction will need to bear the full weight of the bench, so the underframe should be assembled with particular care.
Fitting the seat
Now comes the part of the bench that will see the most use.
Lay the prepared planks evenly across the support battens. Leave a small gap between each plank so that rainwater can drain away freely.
Use high-quality stainless steel screws for fixing. Each screw should sit straight and be countersunk cleanly.
You can then screw the planks together.
Make sure everything is aligned evenly. The appearance of the seat surface will ultimately determine how well-finished the completed bench looks.
Slightly wider slats for the seat look particularly smart, as they give the construction a calm and premium feel.
Adding a backrest and armrests
If you'd like even more comfort, you can extend the construction.
A sturdy backrest significantly increases seating comfort and turns a simple bench into a proper resting spot.
To do this, additional posts are fixed, to which the backrest is then screwed.
Optionally, the bench can also be fitted with armrests. These are especially welcome during longer periods of sitting.
For many garden owners, this is what transforms it into the perfect seat.
Final assembly and checking the bench
Once all the individual parts are prepared, you can carry out the final assembly of the whole construction.
Check all fixings once more. Every screw should be tight and allow no movement.
A first load test is then worthwhile. The bench must not wobble and should stand firmly.
Once everything is correctly assembled, you've completed the most important part of the project.
The bench itself is now built, and from individual planks, concrete blocks and screws, a functional and attractive garden bench has taken shape step by step.
Weatherproofing your garden bench for lasting protection
After assembly, your bench is ready to use — but for a long service life, one important step remains. To keep the construction weatherproof in the long term, you should protect the timber against moisture, UV radiation and temperature fluctuations.
In the garden, the weather is often the greatest challenge for timber surfaces. Rain, sun, frost and temperature changes act on the material throughout the year.
FUXTEC therefore recommends treating all timber parts before assembly, or at the very latest immediately after.
High-quality oils, wood preservatives or a specialist exterior wood stain are all suitable for protection. Those who want to preserve the natural timber grain usually opt for oil or stain. If you'd like to add colour to the bench, an opaque exterior paint is a good choice.
Application is particularly even with the FUXTEC cordless hand sprayer. It allows stains, wood preservatives or paints to be applied comfortably across larger timber surfaces. This saves time, produces a clean result and ensures even coverage of the entire surface. With several planks or larger seat areas in particular, a sprayer quickly proves its worth.
Before applying any product, it's worth giving the surface one last light sand with the FUXTEC cordless sander. This allows protective products to penetrate the timber more evenly.
Good wood protection makes a significant contribution to keeping the bench looking attractive for many years to come.
Which timber species are best suited to outdoor use?
If you want a long-lasting bench, it's worth taking a closer look at the timber you use.
Larch, Douglas fir, robinia (false acacia) and oak have all proven themselves particularly well. These timbers have naturally high resistance to moisture.
Douglas fir in particular stands out for its pleasant workability and attractive appearance. With the right care, the material also remains stable for many years.
Anyone looking for a low-maintenance solution should focus on high-quality materials from the outset. Good materials pay off in the long run and improve the durability of the whole construction.
Alternative ideas for your garden bench
Not every bench needs to follow the same principle. When building your own, there are plenty of ways to adapt the project to your personal style.
A popular option is the combination of concrete and timber, as used in this guide. Equally interesting are constructions from solid beams or logs.
If you enjoy creative work, you could also build a bench from a pallet. With a little sanding and a fresh coat of paint, it becomes an individual piece of furniture for the patio or garden.
Another option is the classic all-timber garden bench with a complete wooden frame and integrated backrest. This construction looks particularly harmonious and suits naturalistic garden styles beautifully.
Those who want to emphasise the natural character of the material often opt for a rustic garden bench made from solid planks or log sections.
Why building your own garden bench is worth it
A bought bench serves its purpose. A handmade bench, on the other hand, tells its own story.
Every decision — from the choice of timber to the width of the seat and the design of the armrests — makes the bench a personal project.
That's exactly why a handmade bench so often becomes a favourite spot in the garden. It combines craftsmanship with creativity and produces a piece of furniture that fits your own vision perfectly.
What's more, you can adjust the dimensions, design and features at any time. The result isn't just any bench — it's your very own DIY bench.
Tips and tricks for a successful project
To help your project go as smoothly as possible, the team at FUXTEC has put together some key points:
- Work on as level a surface as possible.
- Double-check all measurements before cutting.
- Use high-quality stainless steel screws suitable for outdoor use.
- Always pre-drill screw holes.
- Use plenty of sandpaper to achieve a smooth surface.
- Treat the timber with a suitable protective product before first use.
These tips and tricks help to avoid mistakes and noticeably improve the finished result.
For larger projects, it's also well worth working with a second pair of hands. While one person aligns the components, the other can fix them in place.
Conclusion: building your own garden bench makes your garden more personal
Building your own garden bench is one of the most rewarding projects for garden enthusiasts who want to put their personal stamp on their outdoor space. With a manageable amount of materials, you create a long-lasting piece of furniture that can be enjoyed for many years.
Whether it's a modern concrete-and-timber combination, a classic wooden bench or a rustic design from solid planks — the possibilities are virtually endless. With the right tools, a little planning and the right materials, the build is well within reach even for ambitious beginners.
At FUXTEC, we've found that projects like this are exactly what make a garden feel truly personal. Instead of an off-the-shelf product, you end up with a genuine one-of-a-kind piece that fits your style perfectly.
Anyone who enjoys DIY and loves working with timber will find this an ideal project to get started with. In the end, you're left not just with a practical seat, but a place where you can enjoy your garden from a completely new perspective.
Discover our range of garden tools

What's the best wood for an outdoor garden bench?
Larch and Douglas fir are excellent choices due to their natural resistance to moisture and ease of workability. Oak and robinia (false acacia) are also durable options that perform well in outdoor conditions.
How long does it take to build a garden bench?
The project timeline depends on your experience level and design complexity. A basic concrete-and-timber bench with the right tools can be completed over a weekend, though allowing extra time for drying and weatherproofing is recommended.
Do I need special tools to build my own garden bench?
Essential tools include a cordless drill driver, circular saw, jigsaw, sander and hammer drill. A cordless sprayer is also helpful for even weatherproofing application. Many of these can be hired if you don't own them.
What's the ideal height for a garden bench seat?
A seat height between 45 and 50 centimetres provides comfortable seating and makes it easy to stand up. This standard measurement ensures ergonomic comfort for most users.
How do I weatherproof my wooden garden bench?
Apply a high-quality wood preservative oil, exterior wood stain or opaque paint after assembly. Use a cordless sprayer for even coverage, and lightly sand the surface first to ensure the protective product penetrates evenly.
Can I build a garden bench if I'm a beginner at DIY?
Yes, a concrete-and-timber design is very achievable for beginners with manageable materials and straightforward construction steps. Having the right tools and following a detailed step-by-step guide makes the project well within reach.
What's the best location for a garden bench?
Choose a location that suits your needs — beneath a tree for shade, on the patio as a focal point, or near the vegetable patch for rest breaks. Ensure the ground is level and stable before positioning your finished bench.
More articles about garden care

Mulchen mit Pinienrinde: So nutzt du organischen Mulch, um Unkraut zu verhindern
Das Mulchen mit Pinienrinde gehört zu den effektivsten Methoden im modernen Gartenbau und in der nachhaltigen Landwirtschaft. Dabei wird eine Schicht Mulchmaterial auf die Bodenoberfläche aufgebrac...

Bodenverbesserung im Garten: So verbesserst du deinen Gartenboden im Frühjahr für gesunde Pflanzen
Inhaltsverzeichnis Warum Bodenverbesserung im Garten im Frühjahr so wichtig für einen gesunden Gartenboden ist Gartenboden nach dem Winter prüfen: Bodenstruktur, Verdichtung und Bodenart erke...

Richtig Düngen im Garten: Schritt für Schritt erklärt
Inhaltsverzeichnis Warum Düngen im Garten so wichtig ist Bodenanalyse: Grundlage für die richtige Düngung Organische vs. mineralische Dünger: Was ist besser? Kompost, Hornspäne & Co.: Organi...


